
At 3D4Makers we are one of only a handful of PEEK FDM filament suppliers worldwide. Uniquely we have a highly pure PEEK grade which no one else produces. Due to our unique extrusion technology and this unique grade of PEEK we can achieve purities and performance that others can not. This lets the researchers and companies who then 3D Print with 3D4Makers PEEK get higher performance from their parts as well. Despite this PEEK is still a very difficult material to 3D Print with. We see Universities and other research institutes have a number of problems with processing it. Therefore we decided to describe some of the main issues people face when they 3D Print PEEK.
Impurities in PEEK.
Black specs on your PEEK prints are an often recurring problem when 3D Printing with PEEK. These specs can be the result of a number of factors one of them is impurities in your PEEK.
Speccing in PEEK prints due to processing.
Additionally lack of process control throughout the printing process can cause speccing as well.
If a 3D Printer or a part of a printer does not manage the printing process and temperatures well it can cause material to spec as well. Difference in temperatures in different parts of the printer or nozzle assembly may cause this for example.
Material Degradation in the Printer.
Material should not be left to degrade in the nozzle because speccing may result as well. Blockages can also result because of this.

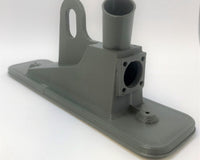
A 3D printed PEEK FDM part made on a Vshaper.
Thermal Control throughout the printing process.
Overall thermal control over the entire process is difficult to obtain because of PEEK's enormous processing window and high temperatures. Crystallization issues, misprints and deformation occur often because of temperature control issues. Actual nozzle temperature is important here.
Improper Crystallization (brown discoloration)
If your part does not turn out beige but instead has brown surface discolorations on it then, this is a sign of improper crystallization. Different layers will be different colors and these indicate that there was not sufficient temperature control throughout the print. You may be able to tell from your logs, slicer or on the part when this happened exactly to trace the origin of the error. Or it may indicate that further steps have to be taken to master the temperature control of your printer.
Higher heat
One possible solution to brown discoloration issues is to print at ever higher temperatures until this is solved. This is not recommended because it replaces a temperature stability issue with a "lets throw more heat at it" solution. In some cases a few degrees more may solve this problem. If it however persists and you are printing at very elevated temperatures you will need to improve the 3D printer itself.
Annealing to solve brown discoloration
Another solution is to anneal the part in an oven after the print. Ideally this should not be necessary (depending on the part) but this can solve the discoloration issue.
Annealing to destress parts and improve mechanical properties
Annealing the part post printing does destress the part and improve its mechanical properties however. Ideally a well printed part could (if it needs to be) be annealed. Using annealing to mask lack of process control in the print however is not recommended.
How to anneal a PEEK 3D printed part
Thermal Control over the entire Build Chamber.
In addition to general temperature control issues it is of particularly important to have adequate thermal management and control over the entire build chamber. Simply adapting a desktop 3D printer to print at 450 C by changing the nozzle will not get you good 3D Printed parts.
Drying out
In many cases the PEEK should be dried out in an over prior to printing. Compared to other materials PEEK does not absorb moisture that much but drying will improve your print performance, if the PEEK filament has not been properly handled before coming to the customer. For best results we recommend minimum 4 hours of drying at 120°C. In aerospace and medical applications we would recommend that you add this to your workflow to remove variables.
Fumes and gasses
As compared to other materials comparatively few harmful fumes are emitted. However, we would always recommend printing PEEK in a closed printer with a heated build chamber and an active charcoal/carbon filter.
3 comments
Anonymous
You can buy PEI sheets with a 3M sticky film backing. We recommend 5mm Ultem Tape with 2mm acrylic adhesive backing.
J. Pomodoro
Thanks for this informative article!
How thick are the PEI sheets you use? How do you stick them to your build surface?
Best,
J
Mark Ulrich
Could you please tell me if your PEEK filament is medical grade ?